
 How to Get A Salon-Worthy Blowout at Home
Here I am, world! In all my naturally wavy/frizzy/bird's nest hair glory.

This is why I don't go anywhere without an umbrella, allow my hair to get wet in a pool, and avoid most activities that would result in my perspiring. THIS is what would happen.
Like so many frizzy-haired girls before me, I grew up wanting stick straight hair. When I was 11, I started chemically straightening my hair, but since I started coloring my hair at 15, I had to forgo the straightenings so I could, ya know, have hair.
So, without a chemical means of getting it, I had to perfect alternate means of getting the smooth, straight hair I wasn't fortunate enough to be born with. And thus, an unbreakable bond with my hairdryer, flat iron, and curling iron was born.

I've gotten really good at styling my hair. I mean, if I had a nickel for every time someone asked me how I do my hair, I'm fairly certain I'd have at least several, if not many, nickels. Which brings us to today's post: How to Get A Salon-Worthy Blowout at Home.
It's an ironic title, actually, since I've really NEVER gotten a good salon blowout (although I'm still totally excited about trying this out). From the first picture, it's pretty obvious my hair has a mind of its own. It doesn't work like most people's hair, straightening out from a paddle brush alone. It requires more technique and styling tools than most stylists are willing/trained to employ. Which is why I know that this tutorial will give you great results. At least, I hope it does. And hey, if it doesn't, at least you don't have to tip me!!
To get started, you must have the appropriate tools:

You should have most of these tools already: hair dryer, 1 1/2 inch barrel curling iron, flat iron, medium sized round brush, and a Chi ceramic straightening brush (great for getting even the kinkiest hair smooth).
As for styling products, I keep it pretty simple. I know there's tons of products designed for helping straighten hair, but I opt only for Moroccan oil and light hold hairspray. For all you fine-haired ladies out there, this should help keep the grease-buildup to a minimum.
Beginning with damp hair (I allow mine to air dry for about 10 minutes), comb a dime-sized amount of Moroccan oil through your hair. Less if you're hair is shorter.

Oh, how did this very modelesque picture of me get in here???

Next, move on to drying your hair.
A.)  B.)
B.)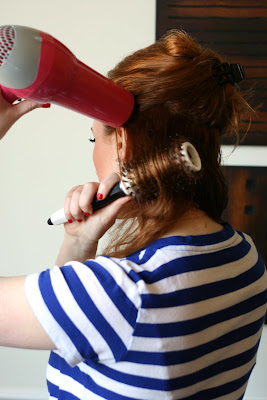
B.)
A.) You're going to dry your hair in sections. Yes, it's going to take some time, but looking sickening doesn't come easy, so get over yourself. Start with the bottom third of your hair. Pin up the rest of your hair to keep it out of the way.
B.) Take a two-inch section of hair and with the round brush perpendicular to your head, begin drying hair, gently rolling the brush under at the ends. (I use the hottest/highest setting on my hair dryer. I also hold the nozzle super close to the section as I dry. I don't care if it's not good for my hair.)
C.) D.)
D.)
 D.)
D.)
C.) Because the round brush alone doesn't always get my hair straight, I'll repeat step B with the Chi straightening brush.
D.) When you've finished the bottom section, let the side section above your ear down. Continue steps A-C until you get to the sides and top sections.
*And now, a note about drying the side sections of unruly hair.
My hairline is the most difficult part of my hair to dry because I have so many cowlicks and curls. I can only assume most stylists don't seem to have this problem, as they all do the same thing: dry the hair AWAY from my face, holding the brush parallel to my head. THIS DOES NOT WORK! So stop doing it. All it does it make a crease in the opposite direction. If you've got my same problem, then surely you already know it won't smooth out your waves or cowlicks. Here's a photo with an X through it to further illustrate the point.

Even if you were touched by an angel when you were born and don't have this problem, I promise you, styling your hair this way isn't doing you any favors.
Instead, holding the brush perpendicular to your face, brush the hair in downward sections. This allows you to smooth out any of the mess around your hairline and also gives you nice lift around your face. It's like we say in Texas, "The bigger the hair, the closer to God."

Similar to the side sections, the front section, which might be bangs for you if you have them, is one of the most important elements of a good blow out. Again, where most stylists get it wrong is pulling the hair toward the back. Using the downward motion you use on the sides, pull the front section in the opposite direction you want it to lay. This will give it height and body in the direction it ends up laying.
For instance, I always pull my front section forward, in front of my face, which gives me lift in the back.

For many of you, you might be satisfied with your hair at this point, in which case, be done and go forth with your fab-a-lus coif. In my case though, I'm just getting started.
When my hair is completely dried, I then go back and straighten any sections of hair that didn't get completely smoothed out from the blow dry. This generally includes, surprise, surprise, my hairline.


Again, for many of you, this may be enough, but I generally like to curl the ends of my hair. It gives the hair extra bounce and frankly, just looks amazeballs. But I'm not just talked curling the ends under. It's a more sophisticated technique than that.
1.) 2.)
2.)
 2.)
2.)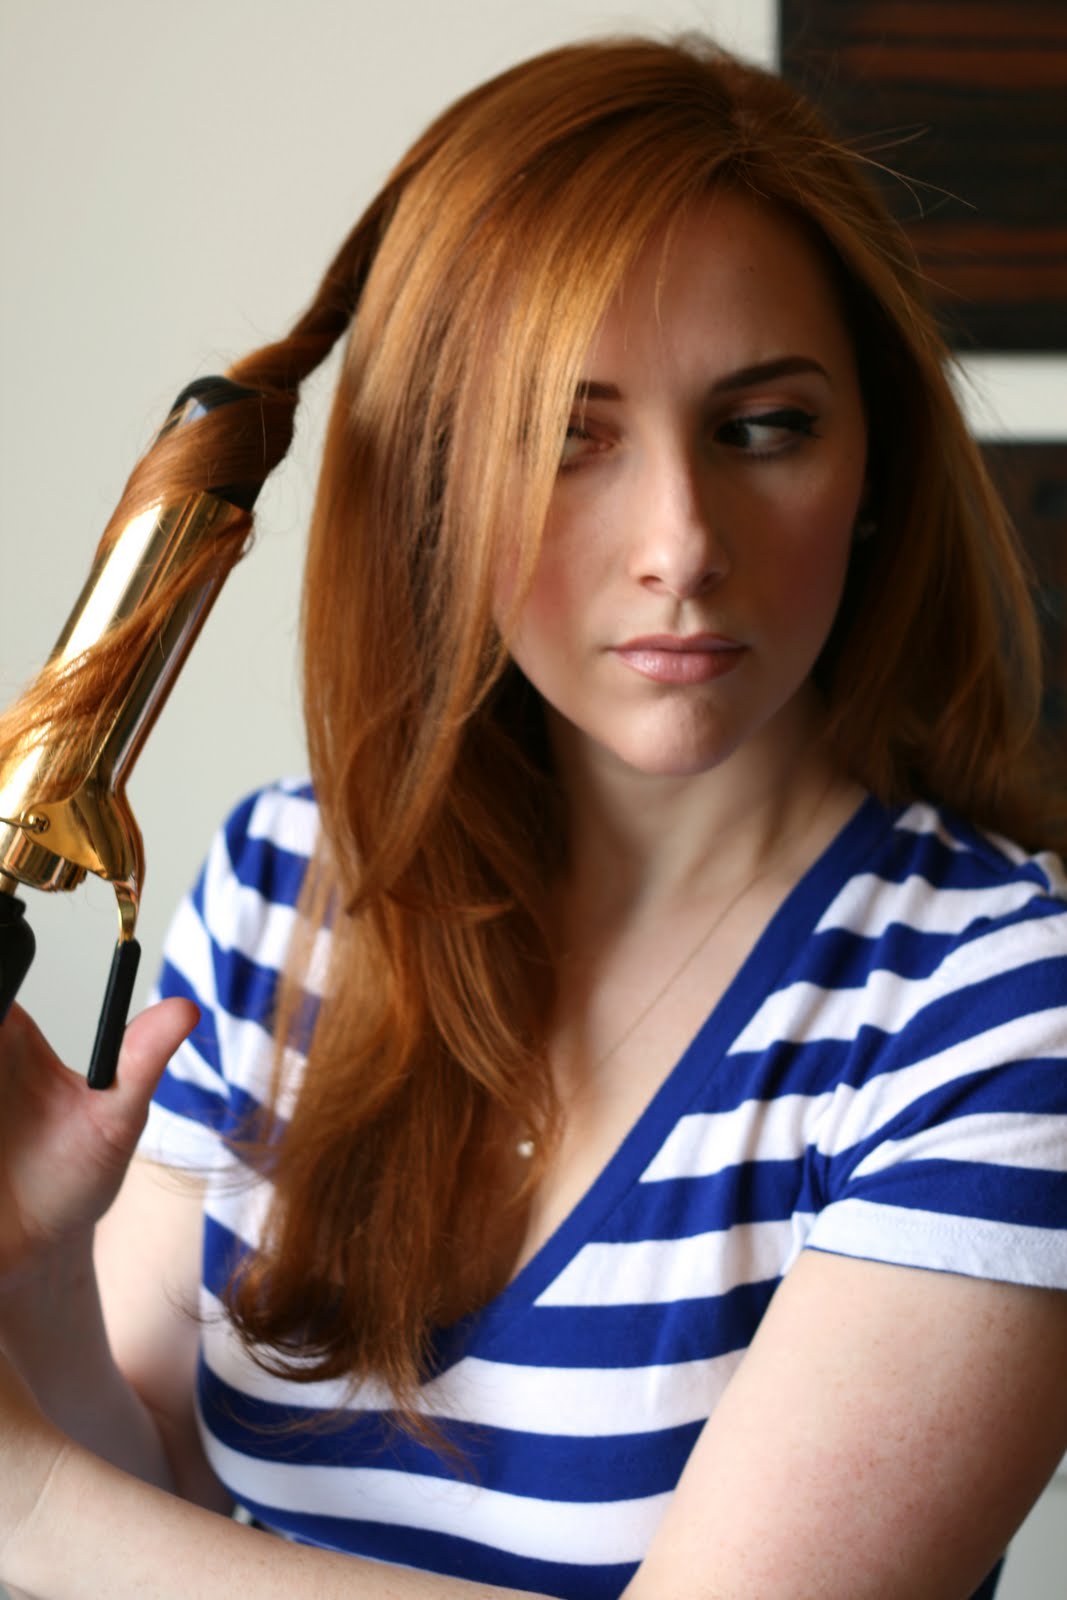
1.) Grab a 2.5 inch section of hair and wrap the hair in your curling iron about half way up the section, leaving the ends out of the clamp.
2.) Then, wiggle the clamp just enough to allow you to move the rest of the hair down the curling iron, twisting the curling iron as you work your way down.
3.)  4.)
4.)
4.)
3.) Continue the wiggle and turn method through the ends of the section...
4.) ...Until you have a loose ringlet.
Do this all over your head, alternating the direction of the curl (i.e., toward your face, away from your face). You'll end up with a head of loose ringlets. You can stop here and finish with a light hold hairspray, or...
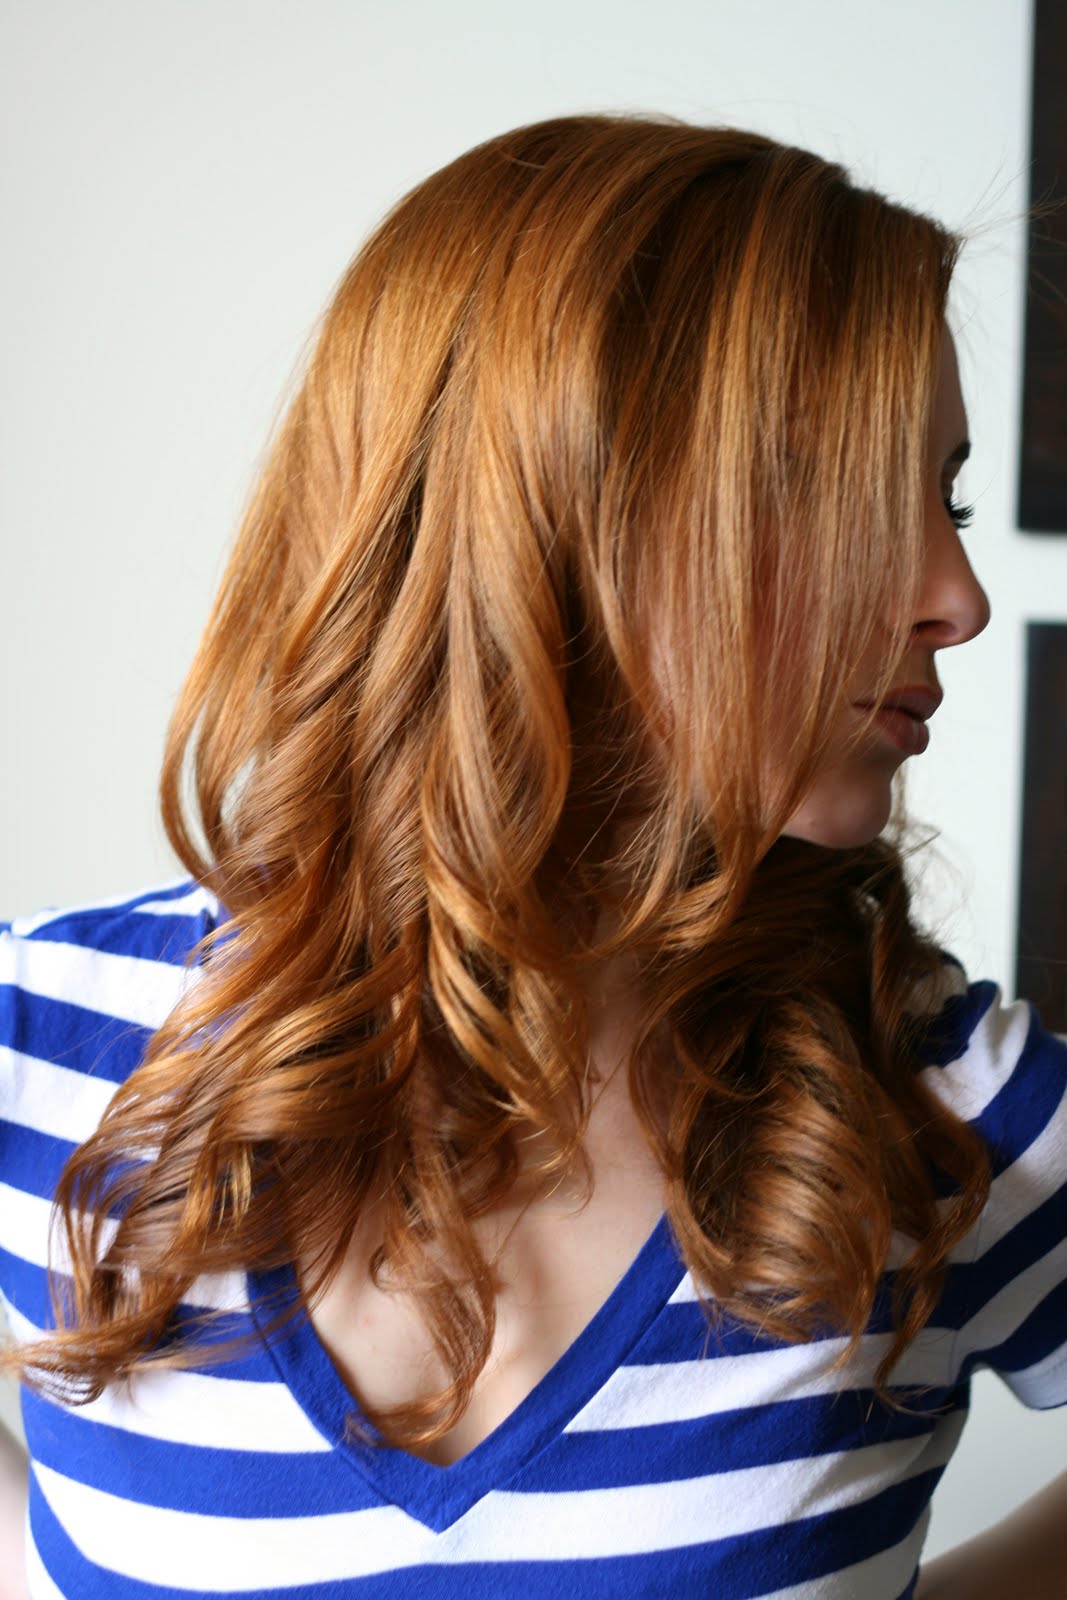
...for a more tousled look, you can shake the curls out with your hands like so:


Finish with a light hold hairspray at the ends and roots.

I just get so pensive when I use hairspray. I think about things like the deficit, ending hunger in third world countries, and what color I should paint my nails this week.


Because of my hair color, I only wash my hair twice a week, three times if I work out, which means this style generally lasts me several days, with only light touch ups in between, making the 45 minutes I spend on my hair totally worth it.
Seriously, don't bitch about the time effort!!! Looking this good takes work y'all!

So dear readers, tell me, do you have naturally curly hair?? Do you like your salon blowouts?? What color are YOU going to paint your nails this week?? Tell me everything in the comments!

26 comments:
TRYING THIS TOMORROW!!!!!!!!
Ok one of my favorite posts to date! #1 that I my exact hair in the before pic, like almost identical except mine is even wavier :/
#2 god you look "amazballs" in navy!
Great post Melissa!
Love this tutorial! I got so excited when you linked to Dry Bar, thinking that maybe they'd FINALLY opened a location in DC...sadly, that does not seem to be the case.
By the way, would you be willing to share who does your eyebrows? My brow girl recently jumped ship, and I'm searching for a new person in Nova or DC. Your brows are perfect, so I had to ask!
- Maggie
But you are so good in styling your hair: I won't ever be able to have hair like that...!!!
Have a lovely day
Sara C.
God what a great post! I am terrible with doing my hair. It's either up in a pony or down straight and I always complain about it. SO SO trying this on the weekend. Thanks for the tips :)
Anna xo
http://lifesshinyprettythings.blogspot.com/
Fab job. I love your blog. I giggle every time I read it.
Great tutorial!
1. I have that hairspray and I love it. I also have the Suave dry shampoo and it is pretty awesome.
2. Your blush looks amazing.
3. I enjoy your facial expressions.
4. Sometimes, when I do a blowout, I'll put my hair in big foam rollers after drying to let it "set" and then follow up with a curling iron if I need to.
:) :)
Love this! I also have unruly curly hair. Moroccan Oil is a godsend! I use the curling mousse and curl cream as well when I'm not straightening. Question though - how do you keep your hair from going wild while you sleep? I'd love to wash my hair less, but when I do, I inevitably have to wear it up the next day because I have a crazy lion's mane!
awesome tutorial! thanks so much for sharing! will be trying this soon :)
Happy Monday!
xxx,
Fashion Fractions
o, how great and usefull post!thank u for this!!! u look fab xx
Gorgeous! Love your hair! I'm sorry, when you say chemically straightened your hair, do you mean as in RELAXING your hair? If that's the case, woah! Never met a non-black girl who relaxed their hair. That's pretty cool!
@Debbie, i have the same problem, but I essentially go through an abbreviated process of this tutorial on my dry hair in the mornings. For the most part, all I have to do is touch up with my flat iron and curling iron. Occassionaly, I'll blast the blow dryer on it if i need some lift.
@Sinful, I guess so--it was pre-Brazilian straightening!! my hair is thick and really coarse, so i need(ed) all the help I could get!
look how pretty you are! sadly, my hair always looks like photo one. and I have nothing to say about it.
Great. This post made me want long hair again. I wish I saw it before I got mad that it always looked like the first picture then cut it off! Looks amazing by the end of it though!
Tikkitiboo + Ahka Vintage
Enter our $200 Giveaway Here!
wow, it looks great! although this is also when I thank heavens for my looks-great-just-air-dried hair, because it would take me like two hours to get ouf the house if I had to go through what you do several times a week.
lovelovelove the blog, following!
jo from slowcatharsis.blogspot.com
great post!! very good explanation! haha...your faces are cute!
http://www.brunetteletters.com/
Your so cute! Love this tutorial! Thank you! btw newest follower here!!
♥
Pearl
I am as they say "Hair Challenged", all those appliances in one of the first photos scare me. BUT I love the faces you make in your tutorial! And your hair of course!!
http://theunemployedstylist.blogspot.com
This is wonderful! I also love to curl my straight hair a little bit, but my hair is naturally really straight so I usually just let it dry naturally and then go for the curling iron. And I only wash mine once a week. You look so pretty!
I love this post - I thought i was the only one to blow,iron and then curl my curly hair. ooo I am so trying the bit around my face i never get them quite right !
OK, so i followed your guide and omg. It was meant to be a practice run for a special occasion next week, which im staying home to detox for... and now i think i may have to go out tonight ! smashing !
love this post. i need that chi straightening brush! and i think i'm painting my nails essie "stylenomics" this week :)
i just discovered your blog and i'm reading through all the back posts.
You look FABULOUS
Love love love this tutorial! I am planning to do a Blowout REMIX post on my new blog soon <HotMess Lioness
I went and had my hair professionally blown out today at a new "blowout bar" that popped up where I live. This concept hasn't caught on here, but hope it does... fantastic.
Love that at home version even more. I will definitely feature your blog and this post in my upcoming post.
Blessings to you!
This is the best tutorial I've ever seen! Thank you so much for explaining not only the how but the WHY!
<3 Tara
Post a Comment